Accounts
The Accounts tab displays the cloud accounts and Kubernetes clusters you have integrated with Panoptica.
Select Settings in the main navigation pane, then Accounts to reach the Accounts tab.
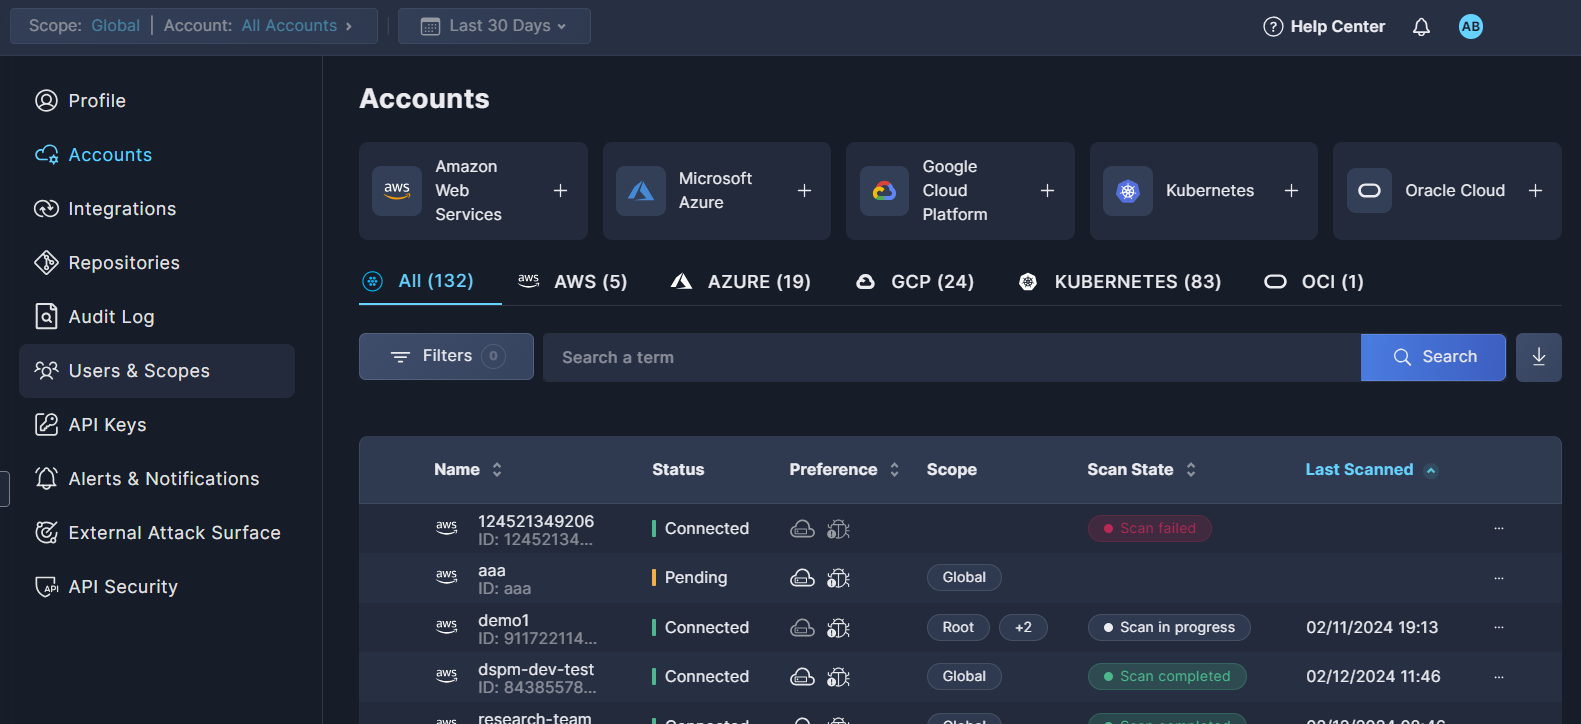
The default view displays all of the accounts and clusters that have been onboarded. Select one of the "quick filters" – AWS, Azure, GCP, Kubernetes, or OCI – to filter the results by that platform. The number in parentheses indicates the number of accounts in each platform.
- Click the Filters button to narrow the list according to ID, Scope, Status, Provider, Scan State, Preferences, and/or Realtime.
- Use the Search bar to look for all or part of an account name or ID. To clear the search, click the ×.
Click the down arrow (↧) beside the Search button to download the list of accounts in CSV format. This is useful for record-keeping and for sharing this information with others.
If you have deployed a large number of accounts, you can configure how many are displayed on each page, from 10 to 200 lines. This option appears below the table.
Accounts table
In addition to Name and ID, the table provides the following information about each account or cluster that you have integrated with Panoptica. Note that some fields only appear for Kubernetes clusters.
-
Status
- Connected: The account or cluster has been successfully integrated with Panoptica.
- Partially Connected: At least one of your selected preferences is successfully integrated, but at least one is inactive
- Pending : The account or cluster has been registered in Panoptica, but not yet deployed in your environment.
- Pending reinstall: A change has been made to the configuration in Panoptica, which requires reinstallion in your cluster.
- Disconnected: None of the selected preferences is active.
- Failed: An error has occurred; hover over the error icon for details.
- Excluded: You have chosen to temporarily halt scanning of this account or cluster
- Deleting: You have chosen to delete the account or cluster
-
Preferences: indicates which features are included in this deployment:
- API Security (Kubernetes only)

- Smart CDR (Kubernetes only)

- Snapshot Scan (cloud services only)

- Serverless Scanning (cloud services only)

- API Security (Kubernetes only)
-
Scope: Global and/or Specific (see Scope Management)
-
Scan State
-
Last Scanned: date and time
Action menu
Click the three dots (•••) at the end of each line to open a drop-down list of actions you can perform on that account or controller. Note that the actions are a bit different for Kubernetes integrations listed in the Accounts table. See Kubernetes actions below.
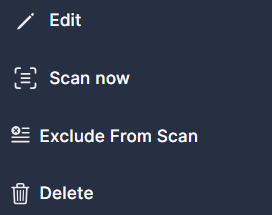
- To change the configuration of an account, select Edit. This will open the onboarding dialog box.
The elements that can be edited vary with the type of account.
Where to edit an AWS configuration
Note that editing the scan settings of an AWS deployment in Panoptica's console UI will create a new CloudFormation Stack. This could be useful if the original stack has been corrupted or deleted, but is not always the best practice.
To change the scanning preferences of a functioning AWS deployment – Workload Scanning, Serverless Scanning, or Data Classification – we recommend editing your existing CloudFormation Stack.
See AWS Onboarding - Edit scanning preferences for details - To initiate an immediate scan, select Scan Now.
- To stop scanning an account, without deleting it, select Exclude From Scan. This is useful for temporarily halting scans without offboarding the account, and for excluding certain auto-generated accounts from an organization.
- To remove an account from Panoptica, and remove the integration with your environment, select Delete.
Kubernetes table
When selecting the Kubernetes quick-filter, the table adjusts to present K8s-specific information. The Scope column is replaced by K8s version and Controller version, and the options on the Action menu are adjusted.
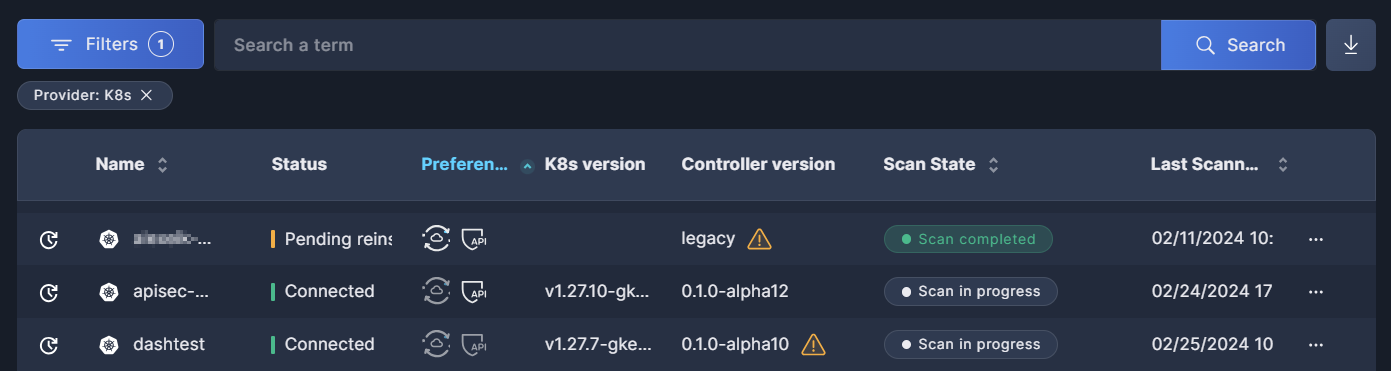
- K8s version: indicates the version of Kubernetes cluster you have integrated with Panoptica.
- Controller version: displays the version of the Panoptica controller. A yellow warning sign beside the controller version indicates it's time to update the controller.
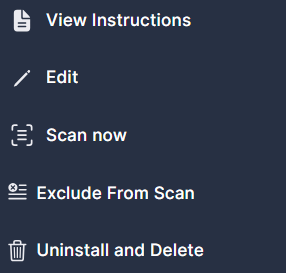
Kubernetes actions
Click the three dots (•••) at the end of each line to open a drop-down list of actions you can perform on that account or controller
-
To review instructions for deploying the Panoptica controller in your cluster, select View Instructions.
-
To change the configuration of the controller, select Edit. The Kubernetes configuration overlay will open.
-
Make whatever changes you want to the controller preferences.
-
If there is a new controller version, updating the configuration includes an upgrade to the controller, by default. If you prefer to maintain your current controller version, uncheck the box beside "New controller version available."

-
If you have enabled direct cluster updates, simply click Update. This will update the account in Panoptica as well as the controller in your cluster.
-
If you have not enabled direct cluster updates, click Update to receive a new Helm command in the configuration window. Copy the command, and apply it in your Kubernetes cluster.
-
-
To initiate an immediate scan, select Scan Now.
-
To stop scanning a cluster, without deleting it, select Exclude From Scan. This is useful for temporarily halting scans without offboarding the cluster.
-
To delete a controller from Panoptica, and remove the integration with your account or cluster, select Uninstall and Delete.
Updated 7 months ago