GCP Onboarding
Panoptica’s frictionless solution scans your Google Cloud Platform resources for risks and vulnerabilities, covering virtual machines, containers, and serverless deployments. Integration is agentless, secure, and easy to set up. Panoptica can connect to a project, a folder, or an organization in your GCP environment by adding a Service Account principal, and providing it with the required permissions.
Role and Permissions
For details on the roles and permissions created during the onboarding process, please visit GCP Onboarding - Details
Privileges
NOTE that the user executing the scripts needs to be an Owner or Administrator of the Organization/Folder/Project being onboarded (depending on the scenario you select).
Or, at a minimum, you need to be able to perform the following actions:
- Create a project
- Create a Service account
- Grant access to principles
Domain Restrictions
If your organization has domain restriction policies in place, you may encounter an error adding IAM permissions. If so, you need to add Panoptica's resource ID <
C01vn6ea1> to the list of domains allowed access under that policy.
See Restricting identities by domain in Google Cloud's Resource Manager documentation for details.
Onboarding Steps
To get started, select Settings in the navigation pane, then the Accounts tab.
Choose Google Cloud Platform, and follow the on-screen steps, which are detailed below.

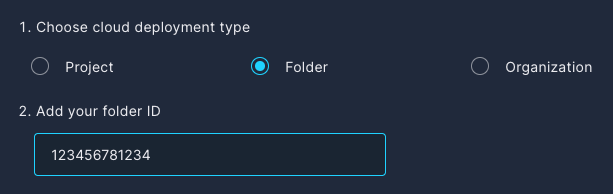
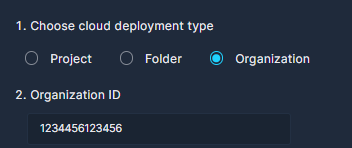
First choose the GCP resource that you would like to connect to Panoptica: Project, Folder or Organization.
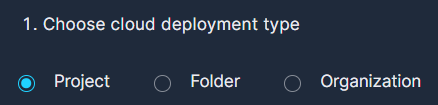
Project - Panoptica will scan only the specified project. CVE and Malware Scanning is not supported in Project deployments.
Folder - Panoptica will scan all the projects under the specified folder.
Organization - Panoptica will scan all the projects under the specified organization.
Click the deployment type you've chosen to expand the instructions below:
Project
Project
If you select Project, the deployment is quite straightforward. The only question is whether you want to define the scanning permissions manually, from the GCP console, or by running gcloud commands that you copy from the Panoptica console
For starters, enter the Project ID of the project you wish to onboard.
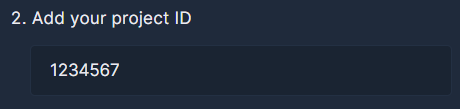
Note that CVE and Malware Scanning is greyed out, since that is only supported in Folder and Organization deployments.
As mentioned, there are two methods you can use to grant Panoptica permission to scan your GCP project: via the GCP console, or using gcloud commands.
Option A: Manually from GCP console
Follow these steps to manually grant Panoptica permission to perform a CSPM scan of your project.
- Log into your GCP project in a new browser window, and select IAM & Admin in the navigation menu.
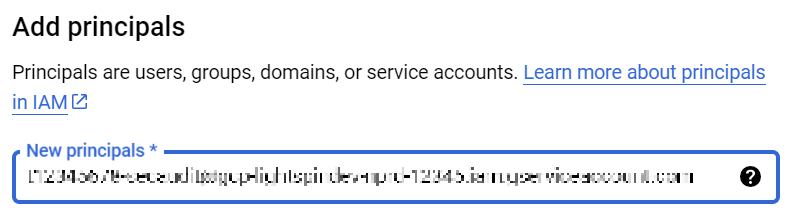
- On the IAM tab, click GRANT ACCESS to pop up the overlay where you configure access.

-
Return to Panoptica's console UI, hopefully still displaying the Google Cloud Platform onboarding page.
Click the Service Account link to copy the account details to your clipboard.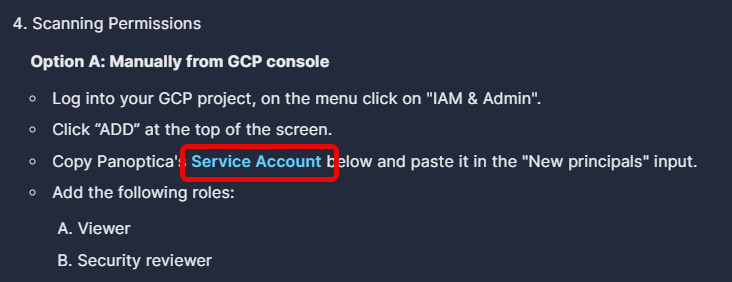
-
Now switch back to GCP and paste the Service Account details into the New principals field.
- Add the following roles for the Panoptica service account. Click +Add Another Role to open additional rows.
- Role Viewer
- Security Reviewer
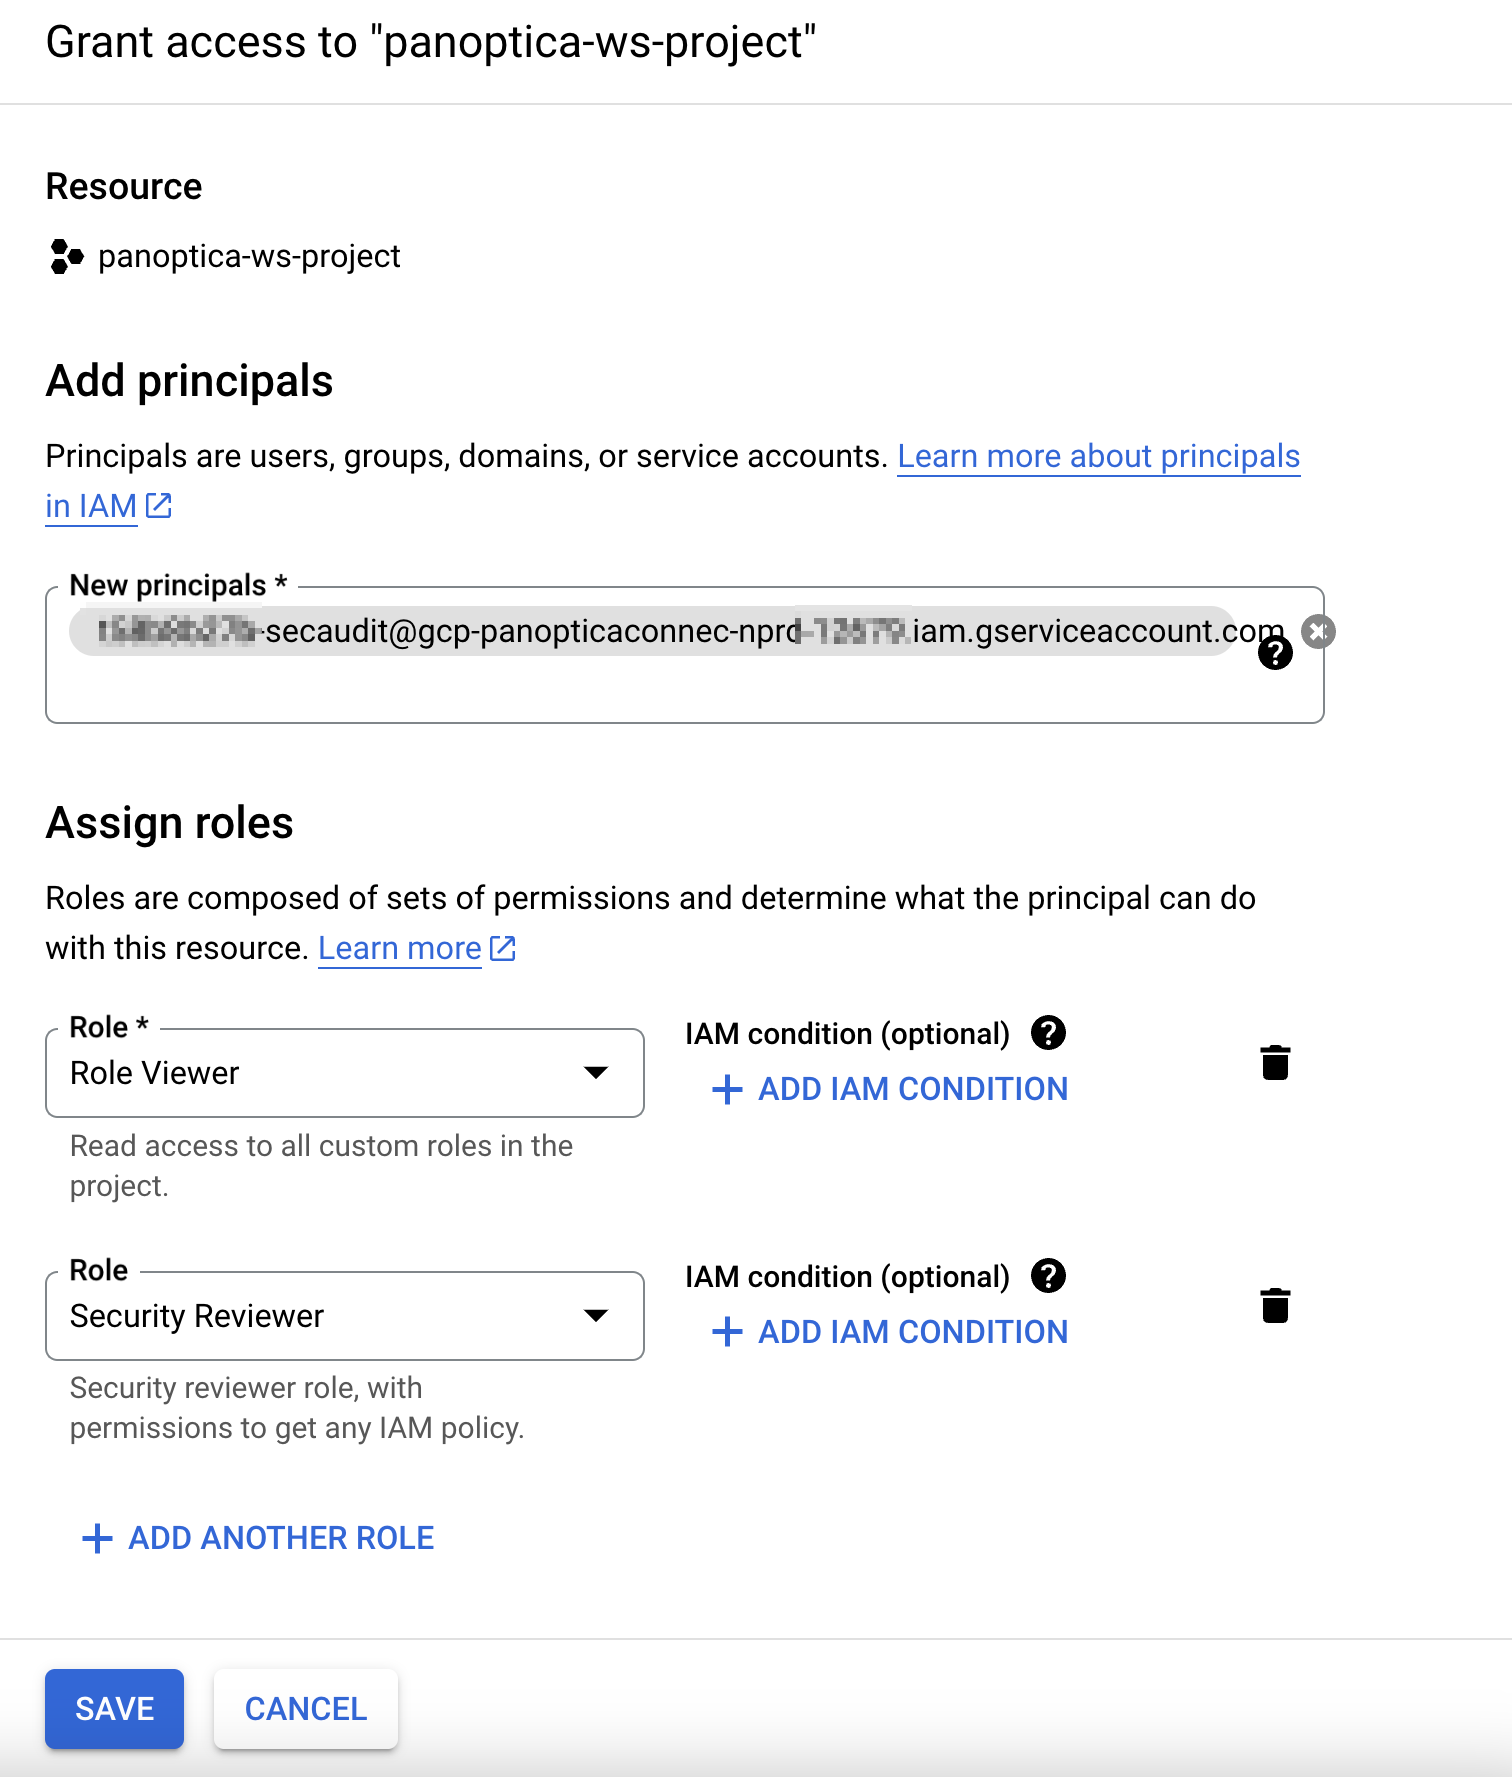
- Click Save
Option B: Using gcloud commands
Follow these steps to automatically grant Panoptica permission to perform a CSPM scan of your project. This procedure will do exactly the same thing as the manual steps described above, using shell commands generated by the Panoptica console to automate the process.
-
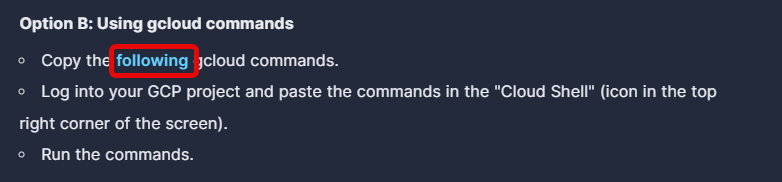
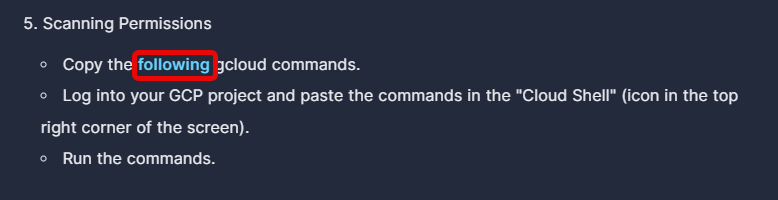
From the Google Cloud Platform onboarding page in Panoptica's console UI, click on the word following to open a new overlay window with gcloud commands.
-
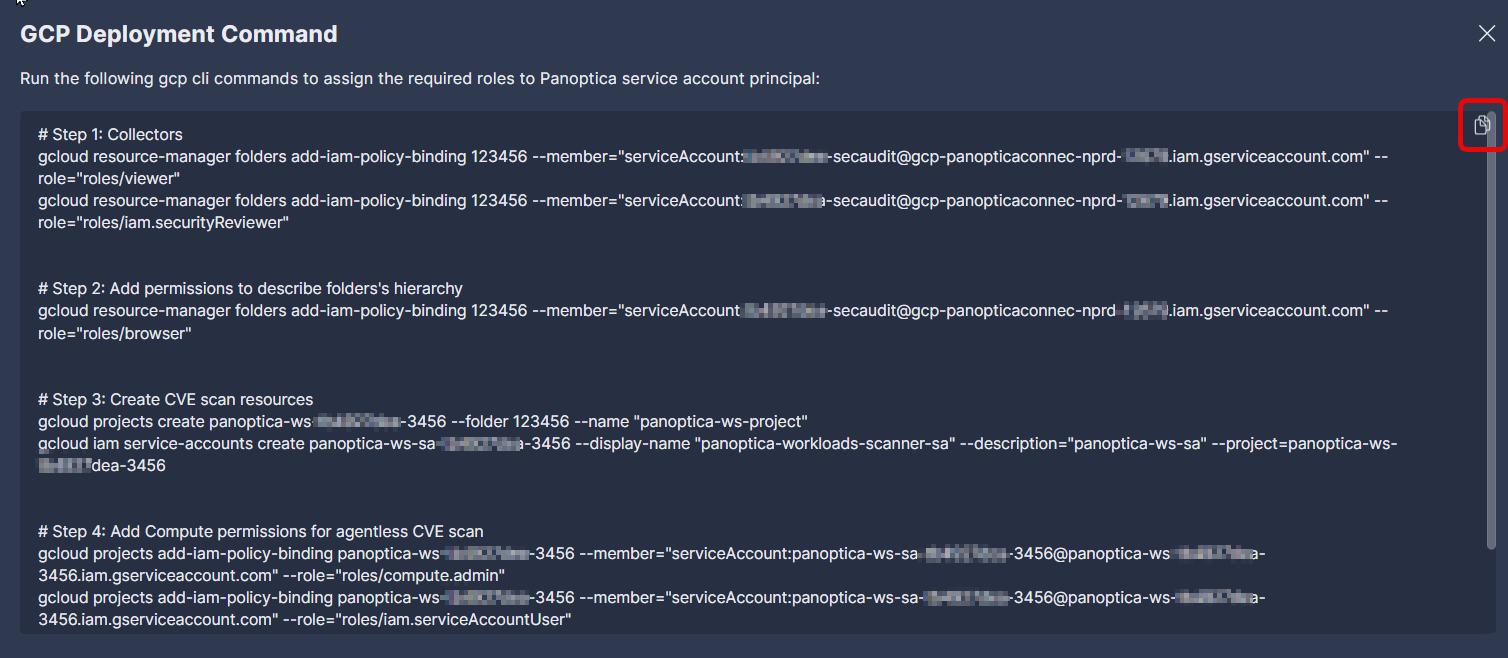
Copy the customized gcloud commands in the pop-up window. For convenience, use the Copy button in the corner of the text window.
For more information about the gcloud commands, please visit GCP Onboarding - Details
-
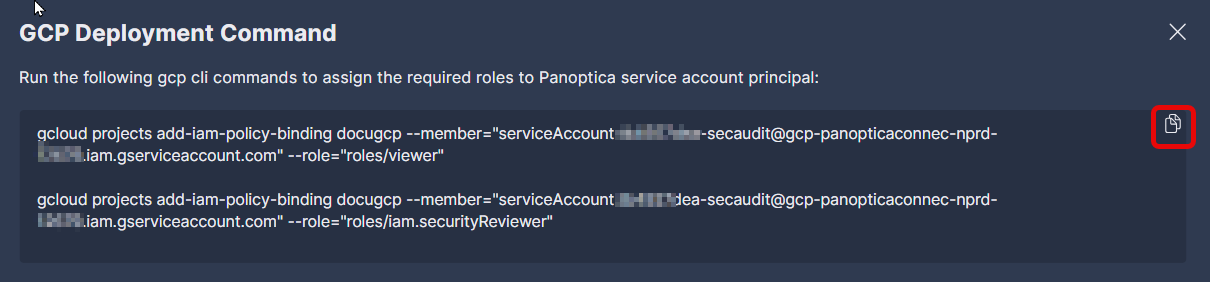
Log into your GCP project in a new browser window, and launch Cloud Shell from the top navigation bar.

- Paste the GCP Deployment Commands you copied from the Panoptica platform into the Cloud Shell terminal.
- Run the commands to assign the required roles to the Panoptica service account principal.
Finally, back on the Panoptica's console UI, type the Display Name that you want to appear in Panoptica's platform.
Folder
Folder
If you select Folder as the deployment type, Panoptica will scan all the projects under the specified folder. With a folder deployment, you have the option of scanning for CVEs and malware, in addition to CSPM scans.
To get started, enter the Folder ID of the folder you wish to onboard, so it is automatically included in the gcloud commands that will be generated in a couple more steps.
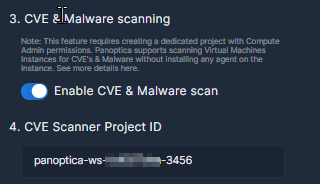
Next, decide whether you want Panoptica to scan your GCP resources for CVEs and malware. If you forego the vulnerability and malware scanning, Panoptica will still scan your cloud security posture, providing inventory, attack path analysis, root cause analysis, and more.
If you enable CVE and Malware scanning, you will see the Project ID of the project that will host the CVE scans. The CVE scanner project ID is generated from the tenant id of the dedicated Panoptica service account and your folder ID: panoptica-ws-<short-tenant-id>-<Four last characters of your folder ID>
Whether or not you enabled CVE and Malware scanning, follow the next steps to generate customized gcloud commands that deploy Panoptica in your folder. These commands will do the following:
- Add read-only access to Panoptica's service account in your GCP account to facilitate CSPM scans of the projects in your folder
- Enable hierarchy discovery, so any future projects created in this folder will be included in the scans
- Create a project to host the CVE scans as well as a dedicated service account for the CVE scans
- Enable the CVE scanning (if selected)
For more information about the gcloud commands, please visit GCP Onboarding - Details .
- From the Google Cloud Platform onboarding page in Panoptica's console UI, click on the word following to open a new overlay window with gcloud commands.
-
Copy the customized gcloud commands in the pop-up window. For convenience, use the Copy button in the corner of the text window.
-
Log into your GCP portal in a new browser window, and launch Cloud Shell from the top navigation bar.
-
Paste the GCP Deployment Commands you copied from the Panoptica platform into the Cloud Shell terminal.
-
Run the commands to assign the required roles to the Panoptica service account principal.
-
Finally, if CVE Scanning was enabled above, you need to enable the Compute Engine API. If this is not explicitly enabled, GCP disables the option to create and use compute resources that Panoptica requires to scan for CVEs and malware, such as creating a Disk, VM or VPC.
-
Still in your GCP portal, launch Cloud Shell from the top navigation bar.
-
Enter the following command, to make sure you are working in the context of the scanning project you created for this purpose.
gcloud config set project <scanner project id> -
Enable the compute engine by running this command:
gcloud services enable compute.googleapis.com
-
Organization
Organization
If you select Organization as the deployment type, Panoptica will scan all the projects under the specified organization. With an organization deployment, you also have the option of scanning for CVEs and malware, in addition to CSPM scans.
To get started, enter the Organization ID of the organization you wish to onboard, so it is automatically included in the gcloud commands or Terraform file that will be generated in a couple more steps.
Next, decide whether you want Panoptica to scan your GCP resources for CVEs and malware. If you forego the vulnerability and malware scanning, Panoptica will still scan your cloud security posture, providing inventory, attack path analysis, root cause analysis, and more.
Whether or not you enabled CVE and Malware scanning, follow the next steps to deploy Panoptica in your folder. There are two methods you can choose from: run gcloud commands in a cloud shell (Option A), or download and run a Terraform file (Option B). Both methods will do the following:
- Add read-only access to Panoptica's service account in your GCP account to facilitate CSPM scans of the projects in your organization
- Create a service account principal in your GCP account that will enable Panoptica to perform a CSPM scan of the projects in your folder
- Enable hierarchy discovery, so any future projects created in this folder will be included in the scans
- Create a project to host the CVE scans as well as a dedicated service account for the CVE scans
- Enable the CVE scanning (if selected)
Option A: Using gcloud commands
- From the Google Cloud Platform onboarding page in Panoptica's console UI, click on the word following to open a new overlay window with gcloud commands.
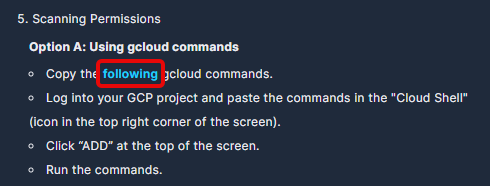
-
Copy the customized gcloud commands in the pop-up window. For convenience, use the Copy button in the corner of the text window.
-
Log into your GCP portal in a new browser window, and launch Cloud Shell from the top navigation bar.
- Paste the GCP Deployment Commands you copied from the Panoptica platform into the Cloud Shell terminal.
- Run the commands to assign the required roles to the Panoptica service account principal.
Option B: Using Terraform
- From the Google Cloud Platform onboarding page in Panoptica's console UI, click on the Terraform link to download the Terraform file.
- Log into your GCP project and enter the gcloud shell. Create a new directory, and upload main.tf into it.
- Initiate Terraform by running
terraform init - Run
terraform applyto create the required resources for the scanning.- If you have enabled CVE and malware scanning, make sure to set the variable
cve_scan_enabledtoTrueterraform apply --var cve_scan_enabled=True
- If you have not enabled CVE and malware scanning, simply run
terraform apply
- If you have enabled CVE and malware scanning, make sure to set the variable
Finally, whether you chose gcloud or Terraform, you need to enable the compute engine API if CVE and Malware Scanning was enabled above. If the compute engine service is not explicitly enabled, GCP disables the option to create and use compute resources Panoptica requires to scan for CVEs and malware, such as creating a Disk, VM or VPC.
- Still in your GCP portal, launch Cloud Shell from the top navigation bar.
- Enter the following command, to make sure you are working in the context of the scanning project you created for this purpose.
gcloud config set project <scanner project id>
- Enable the compute engine by running this command:
gcloud services enable compute.googleapis.com
After onboarding your project, folder, or organization, click Check Credentials to make sure everything is in order.
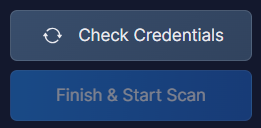
If it is, the Finish & Start Scan button will turn blue and become active. Click it to, well, finish and start scanning.
Updated 9 months ago