Workload Security Rules
You can create your own rules in Panoptica to gain visibility into your organization's policies or compliance. Custom rules appear alongside built-in rules on the Policies page in the Panoptica console UI.
The Workload Security engine enables you to define custom rules that monitor and protect your Kubernetes workloads in realtime. These rules can help you identify vulnerabilities and security findings, to ensure continuous protection and security compliance of your Kubernetes workloads.
Permissions required
Users must have an Owner or Ops role in Panoptica to create custom rules.
An Ops user can edit/delete custom rules that they created; an Owner can edit/delete any custom rule in your tenant. Panoptica system rules cannot be edited or deleted.
See User Management for details on User Roles.
Rule Creation
Click the + Add Rule button at the top of the Policies tab to start building your own custom policy rules.

The Add Rule dialog box is where you define the rule logic, provide details about the rule, and define how and when it is executed.
Logic
Use the Workload Security engine to define custom rules that detect realtime events in your Kubernetes workloads. Beyond just detecting events, you can also configure the rules to block pods that could pose a greater risk.
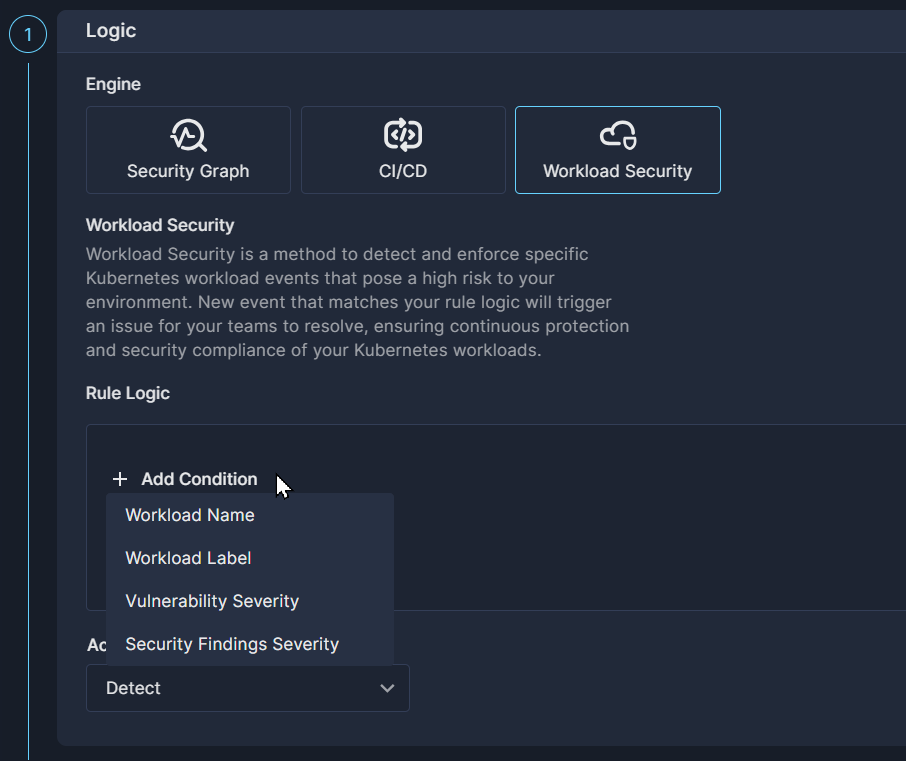
After choosing Workload Security, select one of the condition parameters from the dropdown list:
- Workload Name
- Workload Label
- Vulnerability Severity
- Security Findings Severity
Then define the condition for each parameter that will trigger the rule. You can include as many as four conditions in each rule.
Select the Action you want Panoptica to take with the rule from the drop-down box.
- Detect will list the finding in the Rule Results.
- Action will block the pod where the issue was found from loading
See [Rule Action] below for details.
Rule Info
This is the section where you provide details about the rule.
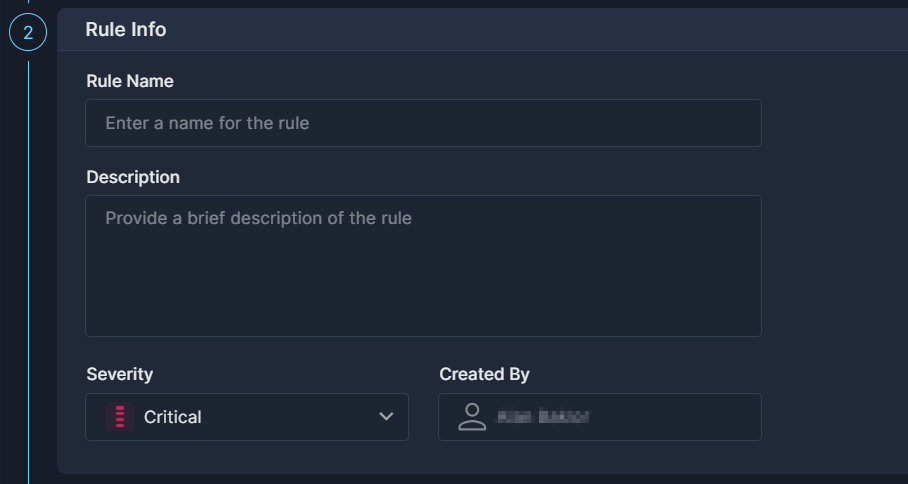
- Rule Name
A short textual name given to a rule. The name must be unique across your environment. - Description
A longer text that explains the motivation for this rule. This is also where you can store notes regarding the logic, execution, etc. - Severity
The severity of the rule’s results. - Created by
This will always default to the logged-in user.
Rule Execution
Once the rule is defined, you need to decide how the new rule is to be applied to your environment.
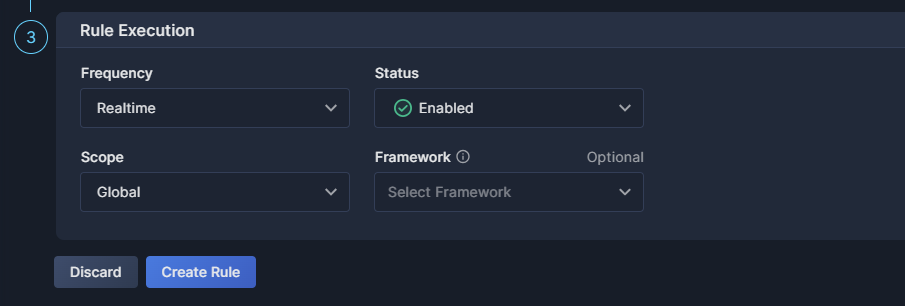
- Frequency
The interval at which this rule will be applied. The default for Workload Security rules is Realtime. - Status
Select whether the rule should be Enabled or Disabled. Disabled rules can be viewed, but they are not executed. - Scope
The group of accounts and/or users on which this rule is to be run.
Note that policy rules are filtered by scope. If you create a rule in the Global scope, it will not be visible if you set the Top Bar Filter to another scope, and vice versa. See Scope Management for details on defining scopes. - Framework
Select the frameworks and/or categories that this rule is to be associated with. You can attach the rule to more than one custom framework, but you cannot associate with built-in frameworks defined by the system.
Don't forget to click Create Rule when you're finished defining your Workload Security custom rule.
Rule Action
Workload Security rules are unique in that they run in realtime to ensure continuous security for your Kubernetes environment. You also have the option of setting Workload Security rules to block a pod from loading.
Detect
Workload Security rules can detect vulnerabilities and security findings in your Kubernetes workloads in realtime. To view the results of a particular Workload Security rule in the Policies table, click the link the the Results column. This will open a side drawer listing details about the rule results.
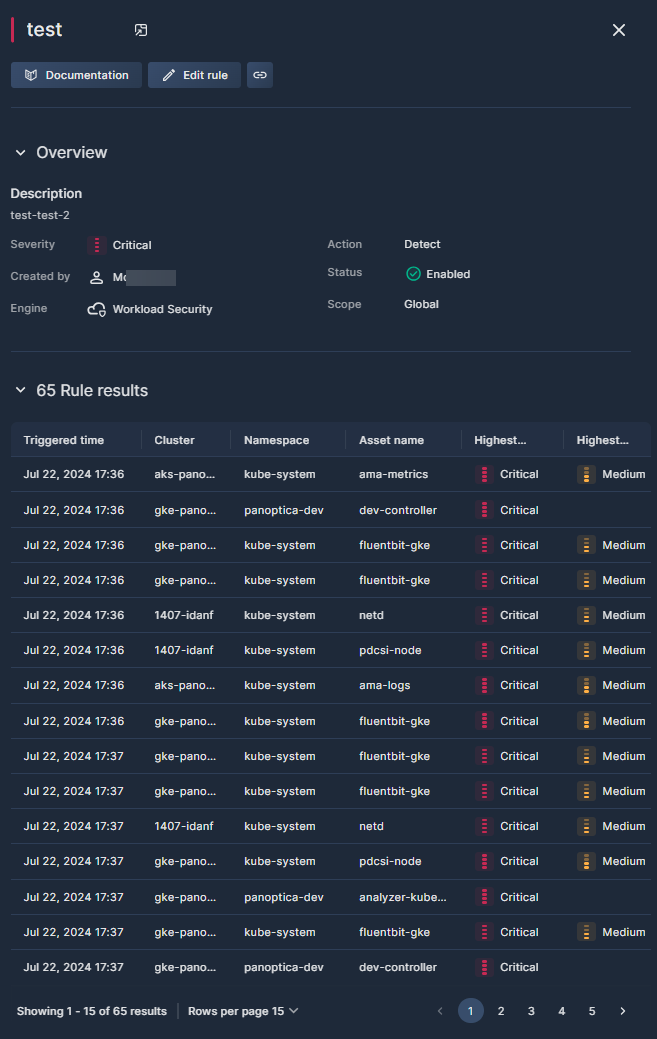
The Description section lists the same summary information that appears in the Rules Table on the previous page:
- Rule Name
A short textual name given to a rule, which must be unique across your environment. The table can be sorted alphabetically by Rule Name. - Severity
The severity of the rule’s results. The table can be sorted by this field. - Created by
The name of the user who created the rule. - Action
The action Panoptica performs once the rule logic is triggered, such as Detect or Block. - Status
Whether a policy rule is enabled or disabled. Disabled rules can be viewed, but are not executed. - Scope
The group of accounts and/or users on which this rule is run.
The Rule Results table lists details about the asset that triggered the rule, including the cluster name, namespaces, time, and severity.
- Triggered time
When this asset triggered the rule. - Cluster
The cluster where the workload is located. - Namespace
The namespace of the relevant workload. - Asset name
The pod where the vulnerability or security finding was discovered. - Highest vulnerability
The most severe vulnerability discovered, from Low to Critical. - Highest security finding
The most severe security finding discovered, from Low to Critical.
Block
Setting the Workload Security rule action to Block will prevent the triggering pod from loading, essentially disabling the workload.
Enable Pod Blocking
In order to support pod blocking, you need to set
k8sec-controller.controller.podValidation.enabled = truein the Helm chart used to deploy the K8s Controller. The default value is
false.See Advanced Kubernetes Integration for details.
A few more things to keep in mind if you enable pod blocking:
- The K8s Controller queries the Panoptica server in order to determine if it should block a pod from running. If the controller cannot reach the server for whatever reason, the workload will run. ("fail open" policy)
- Panoptica will only block a pod after the first time it is run, as it needs to load once in order to be assessed.
- If a pod is blocked, Kubernetes will continue trying to load it to get the deployment up and running. This will result in multiple rows in the Results table.
- Retagging images will cause false positives, so we do not recommend using enabling pod blocking if you reuse tags.
Updated 7 months ago