GitLab Integration
Connect your GitLab group projects to Panoptica to discover security issues earlier in the development pipeline. Panoptica GitLab integration supports both SaaS and self-managed installations. The integration steps are identical.
There are two elements that make up the GitLab integration:
- Triggering GitLab event messages using webhooks
- Performing API requests on behalf of the GitLab group using a group access token (GAT)
To get started, navigate to Code Security in the Panoptica console UI navigation pane, and click + Add Repository to open a drop-down box listing the SCM providers Panoptica supports.
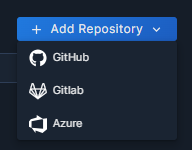
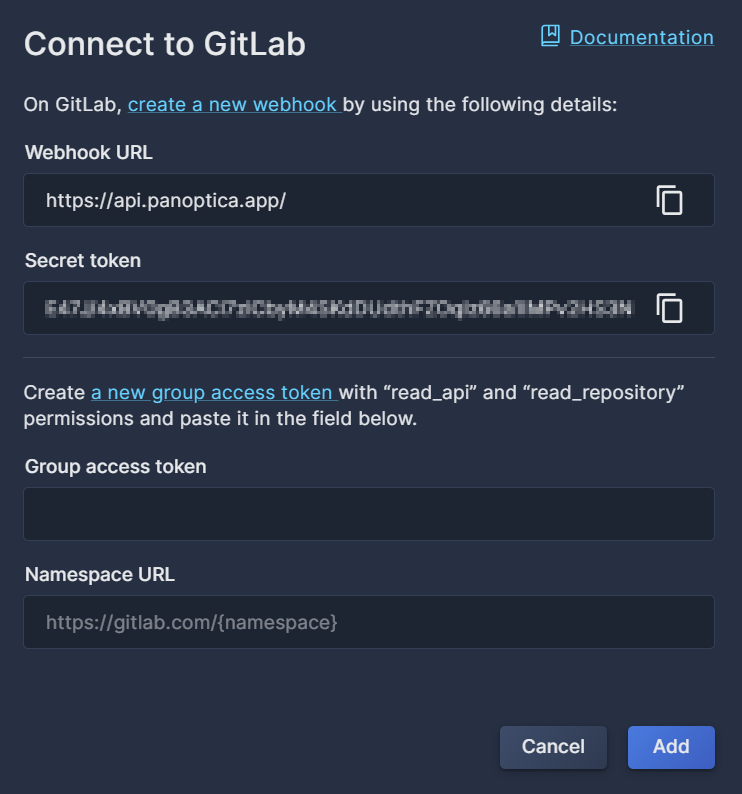
Select GitLab to open a pop-up overlay where you can configure the GitLab connection. Here you will find the webhook URL and Secret Token that you need to create the group webhook in GitLab. This is also where you will enter the group access token that you will generate at GitLab.com or in your self-managed GitLab group.
Group Webhook
Open a new tab and log into your GitLab account to create a group webhook.
Permissions
Please note that you need to have Owner permissions in the GitLab group to add a webhook.
- After logging into your Gitlab account, navigate to the Groups page: https://gitlab.com/dashboard/groups
- Click Settings in the left-hand sidebar.
- In the dropdown menu, click Webhooks.
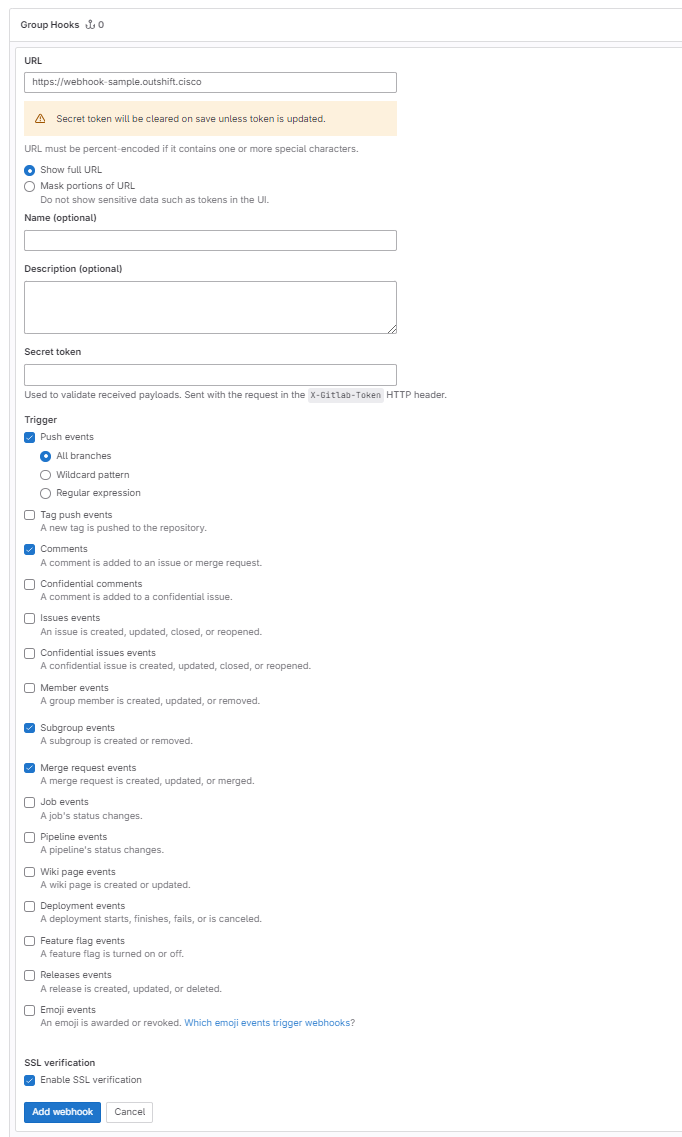
- Click Add new webhook to open the Group Hooks dialog box.
- In the URL field, enter the Webhook URL copied from the Connect to GitLab window in Panoptica.
For convenience, use the Copy button in the corner of the text field in Panoptica. - Copy and paste the Secret Token, also displayed in the Connect to GitLab window in Panoptica.
Use the Copy button in the corner of the text field for convenience. - Under Trigger, select these events to trigger the webhook:
- Push events
- Comments
- Merge request events
- Subgroup events
- Check the option to Enable SSL verification.
- Click Add webhook.
Group Access Token (GAT)
After creating the webhook, you're ready to configure the group access token, which will enable Panoptica to perform API requests on behalf of the GitLab group.
- Navigate to the Groups page again: https://gitlab.com/dashboard/groups .
- Click Settings in the left-hand sidebar.
- In the dropdown menu, click Access Tokens.
- Click Add new token.
- Enter a logical name and an expiration date for the token. The default is one year.
- Select a role for the token: Reporter
- Choose the following Scopes:
- read_api
- read_repository
- Click Create group access token
After it's created, GitLab will display your group access token. Copy the token and paste it into the Group access token field in the Connect to GitLab window in the Panoptica console UI.
Finishing up
Finally, copy your group namespace from the GitLab URL, and paste it into the Namespace URL field in the Connect to GitLab overlay in Panoptica. It should be in the format: https://gitlab.com/{namespace}
Click Add to complete the connection.
Once you've connected your GitLab repositories, Panoptica starts scanning them for IaC misconfigurations, secrets, and code vulnerabilities. You can view the findings on the Code Security screen in Panoptica's console.
Updated 10 months ago