Azure Onboarding
Panoptica’s frictionless CSPM solution scans your Azure resources for risks and vulnerabilities, including virtual machines, containers, and serverless deployments. Integration is agentless, secure, and easy to set up. You can onboard a single Azure subscription or an entire Tenant/Management Group. This enables Panoptica to scan your resources, analyze the configurations, and to maintain your environment's security posture.
There are two steps to the Azure onboarding process. The first step involves creating an app registration within Azure and setting its authentication configuration. This app registration serves as Panoptica's identity in your environment, and is used by our CSPM to interact with your Azure resources. Azure will return essential variable, which you'll need for the second part of the onboarding process.
The second step involves creating roles – according to the preferences you configure – and assigning them to the Service Principal representing the application you created in the first step. Finally, you'll check the credentials on the Panoptica platform, and let the scanning begin.
You'll find here step-by-step instructions for onboarding your Azure account automatically, using a PowerShell script to register the application and an ARM template for the roles. If you prefer onboarding your Azure account manually, please visit Azure Onboarding - Manual Deployment. You also have the flexibility to mix-and-match these methods, such as registering the app manually, then deploying the roles automatically.
Privileges
Sufficient privileges to your Azure environment are required in order to complete the onboarding process. For an optimal onboarding experience, it is highly recommended that a user with Entra IT administrator privileges execute the onboarding process. If an administrator is not available, ensure at a minimum that the user has permissions to:
- create a Microsoft Entra ID (formerly Azure AD) app registration
- Create and assign roles on the resource being onboarded (subscription/management group)
Onboarding also requires Read permission to your Entra ID, which requires consent from a Global Administrator in your tenant.
To get started, select Settings in the navigation pane, then the Accounts tab.
Choose Microsoft Azure, and follow the on-screen instructions, which are detailed below.

Onboarding Steps
- Download the PowerShell script from Panoptica's Azure account page.
Pop-up Blocker
If you are running a Popup Blocker, please disable it before clicking Download Script

- Log into your Azure portal, and launch Cloud Shell from the top navigation bar.

-
Upload the Panoptica script to the Cloud Shell, using the PowerShell console.
-
Run the script in the Azure PowerShell console.
Take note of the identifiers that will be displayed when the script has completed, which you will need in the next couple of steps.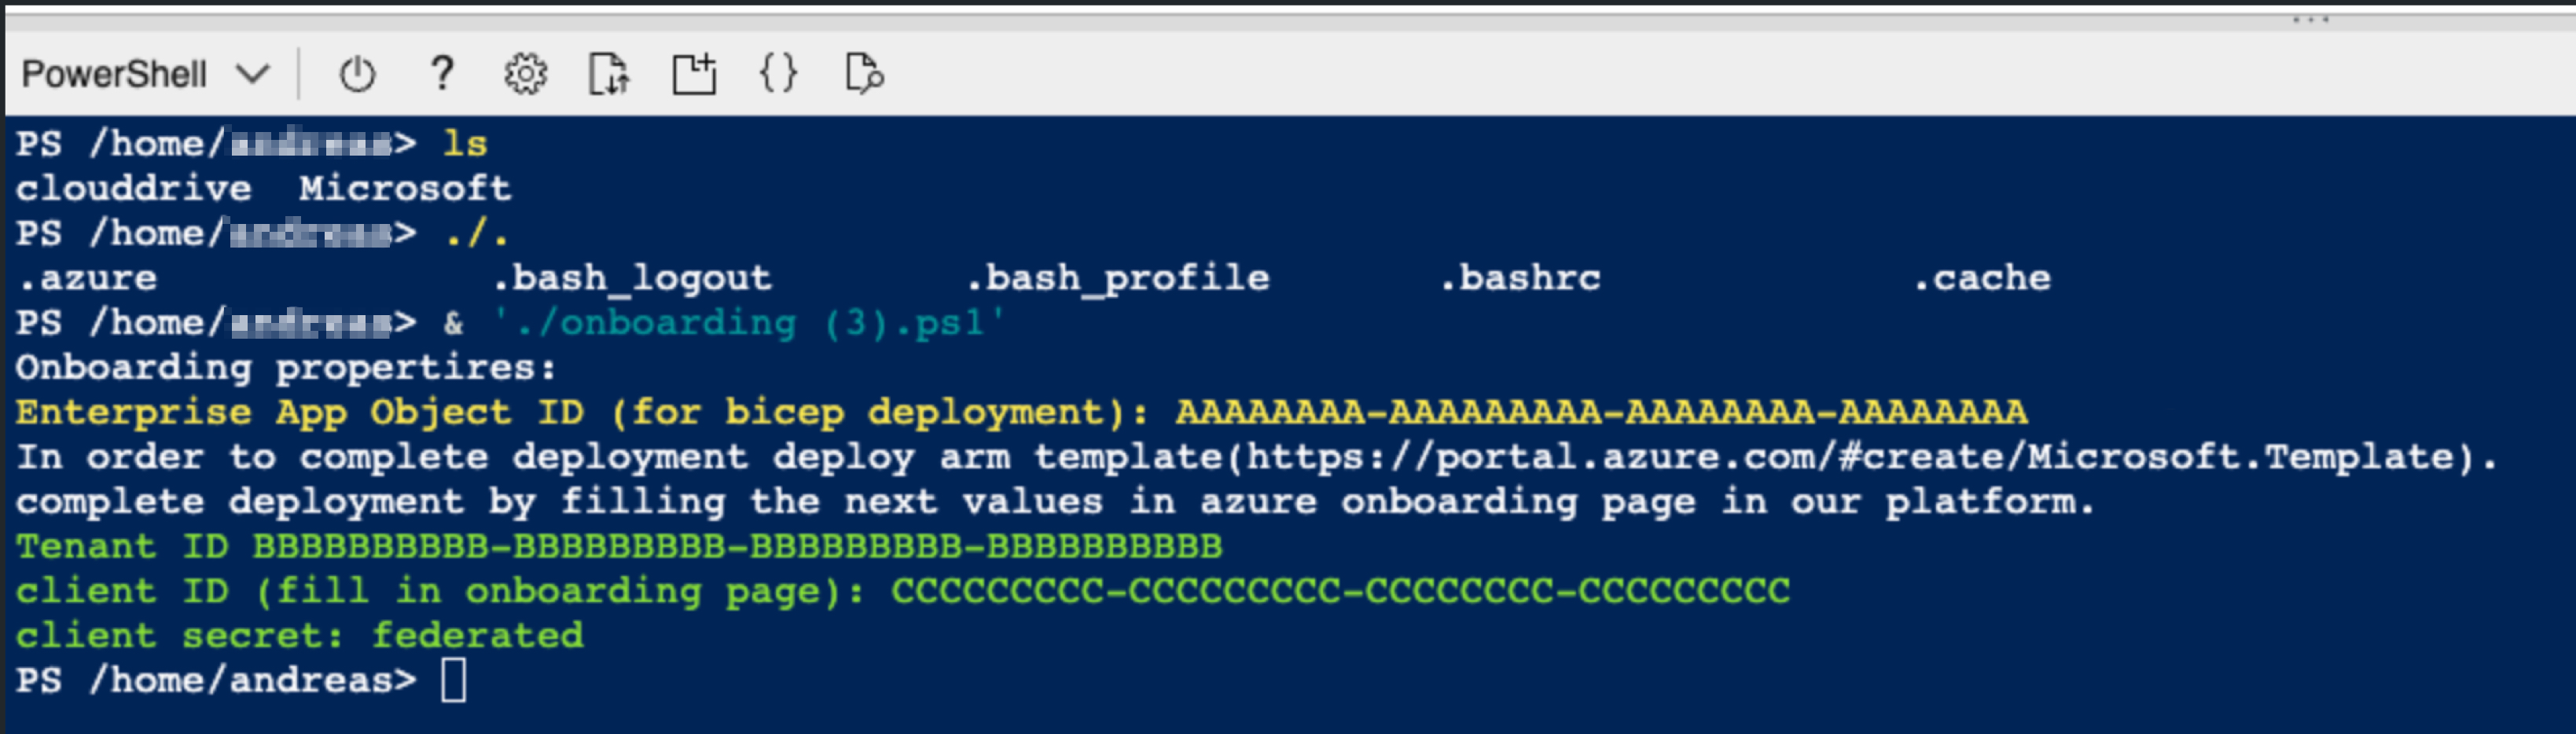
- Application (or Client) ID
- Directory (or Tenant) ID
- Enterprise Object ID
-
Return to Panoptica's Azure account onboarding page to deploy the Bicep ARM template to your Azure environment.
-
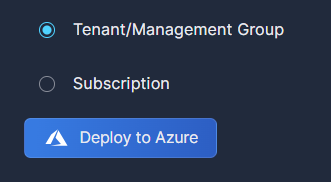
Choose whether you want to onboard an entire Tenant/Management Group, or a single Subscription.
-
Click Deploy to Azure.
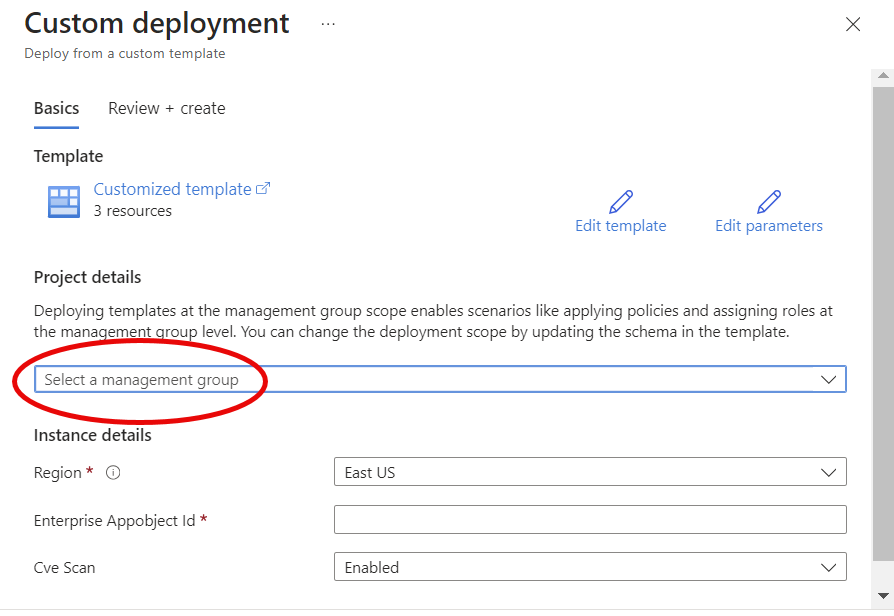
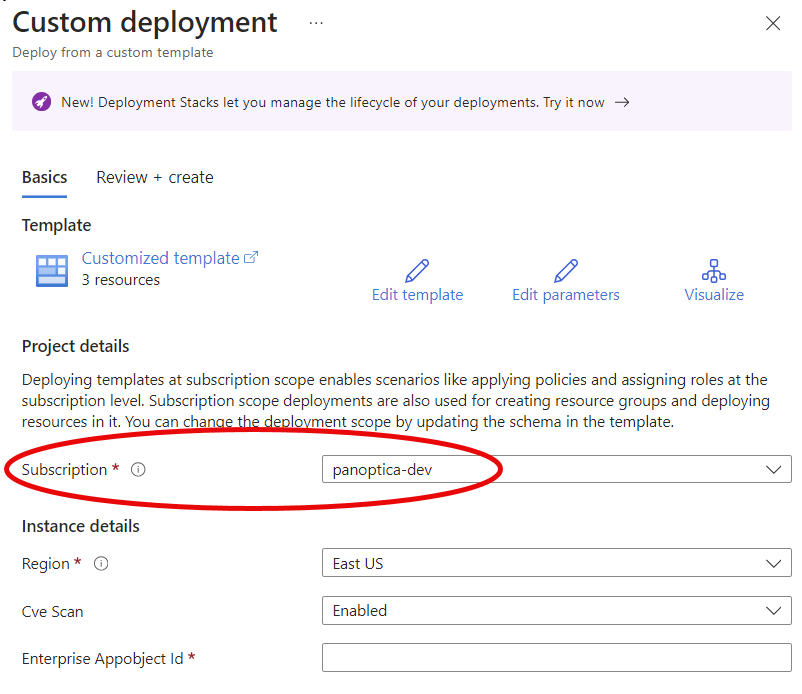
A new tab will open in your browser with a Custom Deployment configuration screen in Azure.
-
If you chose Tenant/Management Group in the Panoptica console UI, make sure to Select a management group in the dropdown list.
If you chose Subscription in the Panoptica console UI, select a subscription from the drop-down list.
-
Under Instance details, complete all three fields:
-
Select your Region from the drop-down list
-
Enter the Enterprise App Object ID you retrieved from the PowerShell script above.
If you didn't jot down the Enterprise App Object ID, you can retrieve it again by browsing to Microsoft Entra ID → App Registrations → <name-of-your-panoptica-app> in the Azure portal. You'll find it under Essentials, listed as simply "Object ID". -
Select whether you want to Enable or Disable the CVE scan
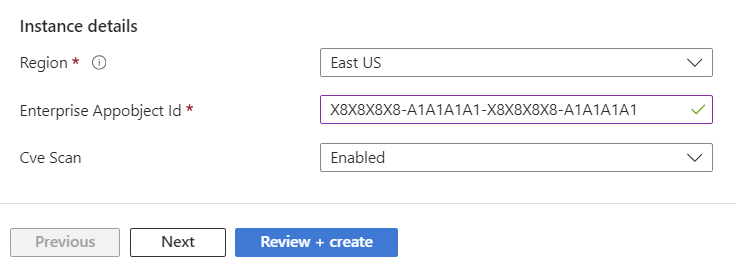
Don't forget to click Review + create
-
-
-
Return to the Panoptica Console tab, and enter the Directory (Tenant) ID, and the Application (client) ID you retrieved from the PowerShell script above.
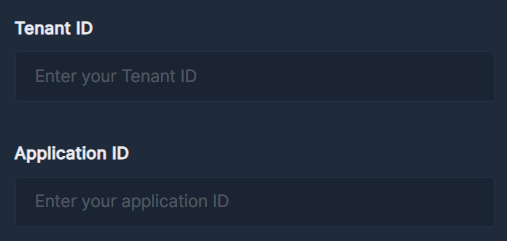
Retrieving identifiers
If you don't have those identifiers available for whatever reason, you can find them again in your Azure portal.
Browse to Microsoft Entra ID → App Registrations → <name-of-your-panoptica-app>.
On the default Overview tab, you'll find them under Essentials.
- Under Application Secret, choose how you would like Panoptica to be authenticated in your Azure environment.
We highly recommend Federated Identity for stability.
Application Secret credentials need to be renewed periodically; expired credentials will cause the security scans to fail. If you are required to use application (or client) secrets, we recommend setting the expiration period to 2 years, to minimize disruptions.

-
Finally, decide whether you want Panoptica to scan your Azure resources for CVEs and malware. Enabling CVE and malware scanning creates a custom role to facilitate the creation of an agentless CVE scan infrastructure within your environment. This infrastructure requires permissions for managing resources, including creating and managing compute instances for scanning purposes, as well as network resources for management and communication with our platform.
-
Learn more about CVEs in Panoptica at Vulnerability Management.
-
Learn more about the permissions required to facilitate CVE and malware scanning at Azure CVE Scanning.
If you forgo the vulnerability and malware scanning, Panoptica's CSPM protection will still provide inventory, attack path analysis, root cause analysis, and more.
-
Before finishing, click Check Credentials to make sure everything is in order.
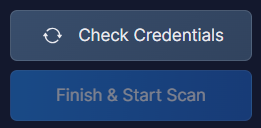
If it is, the Finish & Start Scan button will become active. Click it to, well, finish and start scanning.
Resources
Panoptica creates infrastructure in about two dozen Azure regions around the world to support the scans. The infrastructure consists of a resource group, a virtual network (VNet), a subnet, a network interface (NIC), and a scale set. This comprehensive framework is crucial to ensure we have all necessary assets for scanning your resources.
We launch 10 VMs at a time on this infrastructure to scan your resources. If there are still messages in the queue, we request additional VMs – 10 at a time – until the queue is empty. All transient assets (VMs, disks, snapshots) are deleted once the scan is finished; the infrastructure remains for the next scan.
Updated 9 months ago