Kubernetes Deployment
The Panoptica controller is deployed as a single pod in any Kubernetes cluster, including managed environments such as OpenShift and GKE. From there, it can apply security posture management on your Kubernetes clusters, as well as protection of the workloads in those clusters.
Once the controller is deployed, your cloud workloads will gain all the benefits of Panoptica security: visibility, inventory scanning, attack path analysis, etc. You can also choose to incorporate API Security and Realtime CDR at deployment. Panoptica enables implicit, automatic scalability as you grow the cluster to production scales.
Prerequisites for the cluster
- Kubernetes 1.23 or later
- Helm version is 3.8.0 or higher, with OCI registry support
- At least three nodes in the cluster
- K8s CLI (kubectl) should be installed on the machine or VM from which the deployment is run, with admin permissions to the cluster
- DNS resolution and external access to these domains, on port 443:
- Panoptica platform: appsecurity.cisco.com (34.74.85.197)
- GCP Container Registry (if not using internal registry): gcr.io/eticloud/k8sec
- Resources: 8 GB memory, 1.2 vCPU cores (total, for all nodes).
To start securing your Kubernetes resources, log into Panoptica and register your cluster in the platform. After registration, use customized Helm charts to deploy the Panoptica controller in your cluster.
Onboarding a Kubernetes cluster
To get started, select Settings in the navigation pane, then the Accounts tab.
Choose Kubernetes, and follow the on-screen steps, which are detailed below.

1. Define Preferences
In addition to workload protection, you can add Panoptica's API Security controller, and the Cloud Native Detection and Response collector to enhance the security of your K8S clusters. Selecting those preferences on the Kubernetes deployment screen will add those elements to the deployment Helm charts.
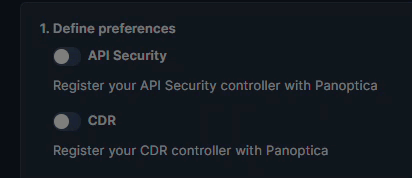
API Security
Panoptica's API Security builds and maintains a catalog of the APIs in your environment, including the APIs you expose (internally and externally), as well as third-party APIs your applications consume. Along with trace source collectors, Panoptica's API Security controller analyzes risks and vulnerabilities, assigns risk scores, and helps maintain your security posture. See API Security for details.
Cloud Native Detection and Response (CDR)
Adding the CDR service to your deployment enables K8s runtime protection, so you can discover security events as they happen. Panoptica then issues alerts via the platform of your choice, according to severity levels that you configure.
See Notifications and Alerts under Platform Management for details on configuring notification channels and CDR alerts.
2. Register Cluster
- Enter a unique name for your Kubernetes cluster, as you want it to appear in Panoptica.

- Click Register to define the cluster name in Panoptica.
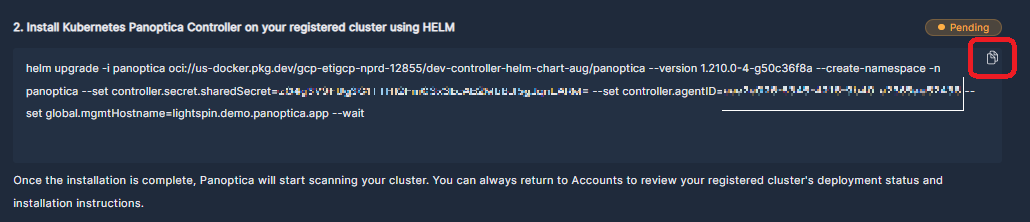
- Once registered, Panoptica will generate an access key for your cluster, and the Helm commands will become visible.
Copy the Helm chart commands, which you'll use to install the controller in your cluster.
For convenience, click the Copy button in the corner of the text window.
RedHat OpenShift Installations
If you are installing in a RedHat OpenShift cluster, you must append the following string to the Helm upgrade command:
--set global.isOpenShift=true
3. Install the Controller
Now go to your machine or VM and run the Helm chart installation commands to install the controller on your cluster.
Note that the installer requires admin permissions to the cluster to deploy the controller.
The Helm chart commands contain a unique agentId and sharedKey, which must only be used to install on one cluster. You can deploy Panoptica on multiple clusters by registering each one separately in the platform.
The cluster will now appear in the table on the Accounts page. Once Panoptica's controller has been deployed in your cluster, the Status will change to "Connected".

Click the three dots (•••) at the end of each line to open a drop-down list of actions you can perform on that cluster:
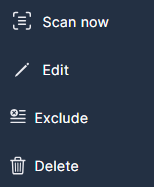
- To initiate an immediate scan, select Scan Now.
- To change the name of the cluster, select Edit.
- To ignore a cluster, without deleting it, select Exclude. This is useful for temporarily halting scans without offboarding the cluster, and for excluding certain auto-generated accounts from an organization, such as HR.
- To remove the controller from Panoptica, select Delete.
Updated 12 months ago